Last week for Makeup Monday, I posted on the Best and Worst Liquid liners and got a great response to the post. I even had a few readers ask me to do a tutorial on lining your eyes. The problem that I had with doing an original tutorial is that not everyone has the same eye, so the tutorial would not be beneficial to everyone reading it.
With that being said, I am bringing you another Pinterest favorites post with eyeliner in mind. I went on Pinterest and found some great posts to help you find your eyeliner style. The pictures below are not links but I am inserting where they can be found below the photos. I will also link my Pinterest Makeup board below.
batalashbeauty.com
mymakeupideas.com
fabfashionfix.com
thebeautydepartment.com
stylecraze.com
musicalhouses.blogspot.com
To see more tips on applying eyeliner or other beauty products, visit my Makeup board on Pinterest.
As a little added bonus, I am also including a YouTube video on how to apply eyeliner. This video has 9 different techniques. Again, please be mindful that your eyes may not be set like hers so results may vary.
**Do not be discouraged about wearing eyeliner, perfecting application takes time and practice! And once you get the hang of it, it will literally take you a minute or less to do both eyes. Leave your comments below! Thanks for reading!!**
What you will need: Candle Jars (Square or Round) Candle Stick Holders Ribbon (optional) All materials for this project can be found at Dollar Tree in the candle isle. They are regularly found items so this project can easily be duplicated. Directions: 1. Remove all price stickers. These are glass and we are gluing them so you are going to want a clean surface. 2. Put hot glue around the rim of the candlestick holder.It will begin to dry pretty quickly so work fast, don't worry if the glue starts to drip. 3. Place square jar on the top of the candlestick holder while the glue is still hot. It will bond pretty quickly so make sure its straight! You also don't want it to look messy. Finished Product Lip Gloss Holder 4. Repeat. For a more unique look, try putting the candle jar on a slant when gluing. This will only work with the round type jars. You will get something that looks like this: 5. Add ...
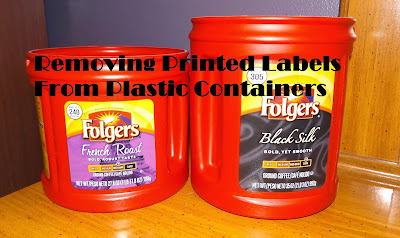
So if you have been following my blog. you know that I have really been getting more organized in 2015. One way that I continue to add new items to my home is to recycle the products that I use. Recently, I came across this Pin that I wanted to try out for baking ingredient storage: find this tutorial on www.hometalk.com Now while this idea is very clever I wasn't sure if I would use paint to redo the cans that I have. This got me thinking about another Pin that I saw on Pinterest about removing printed labels with nail polish remover. Found on www.2busybrunettes.com After I saw this Pin, I checked it out on YouTube and with thin plastic, it does work. With this in mind I wondered if I could remove the label from the Folgers Container. Which brings us to this weeks trial. TRIAL What You Will Need: Before: Directions: Fold a piece of paper towel and soak it in nail polish remover. Place nail polish soaked paper towel on the label for 5 minutes....
If you live in a place where it snows regularly, nothing is worse than when you bust your butt shoveling and later realize that you are out of salt for the ground! And if you use special salts, like those safe for dogs' paws, you could be out of luck in getting your salt until the next day if stores are closed. I wanted to find a method online that used items that I would likely have. So, I went to Pinterest and I found this pin: I checked out the website to make sure that it was legitimate and it actually had some great tips for frugal living. If you are interested, visit the Debt Free Spending Website after you finish reading this post. ;) Homemade Ice Melt Ingredients 1-Teaspoon Dawn dish soap 1-Tablespoon Rubbing Alcohol 1/2-Gallon (2-Quarts) Warm Water Directions Mix all ingredients in a bucket or spray bottle. Use on ice. Note: This formula is said to be safe for pets and concrete. Pre-Trial Questions to Myself Does t...


Comments
Post a Comment