Posts

Showing posts with the label Thrifty Thursday

Thrifty Thursday: DIY Folgers Containers

Image
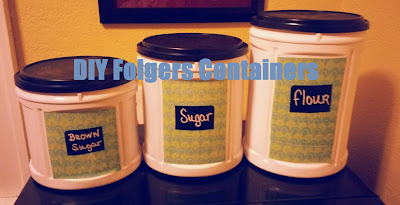
Happy Thursday! So a few weeks back I posted a trial called  Removing Printed Labels From Plastic , using Folgers containers that I recycled. In that post I told readers that I wanted to recreate the Pin below from Pinterest. The reason that I wanted to get the printed labels off of the containers first if possible because I was thinking of leaving them red. Unfortunately I was not able to use the acetone method to remove the label so I decided to paint them. Before: I was lucky to collect a small, medium, and large containers. Here is one below: I spray painted two of the containers first. I still had some of my trusty Rustoleum spray paint left so I used it up. Sadly I accidentally deleted the picture of the spray paint results so you just get a can of spray paint. ;) I wanted save the third container to paint with acrylic paint. I wasn't very confident on the paint sticking to the plastic well, but I like to try things out so I went with it. It turned o...

Thrifty Thursday: DIY Bird Feeder

Image
Recently, I came across this Pin on Pinterest which showed one way that you could repurpose a teacup and saucer: And I thought to myself, how adorable! I wanted to recreate this to add to my garden so I headed to the thrift store. What You Will Need: Teacup and Saucer Hot Glue or E-6000 Twine Spray Paint (optional) Unfortunately for me on the day that I went thrifting I could only find one teacup (pictured below), but it was only $0.25 for the set. I figured that I could spray paint them so I bought them. 1. Clean your dishes. Apply glue to the center of the plate. 2. Place your cup on the plate sideways, with the handle facing upward and hold firmly. And you should end up with something like this: Optional Step 3. Spray your cup with your spray paint color of choice. I had this white so I just used it. 4. Use twine to make a rope to hang your bird feeder. Use hot glue and wrap the twine for a secure hold. And you're done! ...

Thrifty Thursday: DIY- Recycled Makeup Brush Holder

Image
Happy Belated Earth Day! In honor of recycling to Save Our Earth, I decided to give you one idea of how easy it is to reuse product packaging from the items that you buy. While you may not be able to duplicate this project exactly, I am hoping that you think twice before throwing your recyclables away. I recently bought another makeup brush set so I needed to find a new way to store my brushes. I also wanted to find a way to separate the clean brushes from the ones that I am currently using. So recently when I bought a plant starter kit from Target, I decided to save the box and use it for my brushes. The packaging was a thick cardboard with built on dividers, which is pretty rare. Sorry, forgot to take one the opposite way My Project I started by spray painting the cardboard. What I Used To Decorate:   Pencil Scissors Small Sponge Brush Mod Podge Scrapbook Paper After the spray paint dried overnight, I traced I piece for each part of the box th...

Thrifty Thursday: DIY Egg Garland

Image
Easter is coming up quickly this year! And it is yet another holiday that I have minimal decorations for. So of course I did a DIY project to decorate my fireplace mantle, and now I am sharing it with you. I set off on Pinterest to find different Easter garland ideas and I found a bunch.Most of the garland ideas involved using string and the hole at the top of the egg but I thought that there had to be an easier way. What You Will Need: Twine Plastic Eggs Hot Glue/ Glue Gun Directions: 1. Measure and cut your twine to size. Then decide how many eggs you will use and what distance apart you want them. You should also decide on a color pattern. 2. Use your glue gun to add a dab of hot glue to each egg. Do not make your dab too low or the egg will flop forward. 3. Continue with your eggs. Remember to keep in mind the distance that you are gluing them onto your rope. Finished Product: This DIY didn't cost me anything because I already had the twi...

Thrifty Thursday: DIY Memo Board

Image
If you follow my blog than you will already know that recently I have done a few DIYs to update my daughter's bedroom. The last item that I made for her room was a memo board. This board consists of a cork board, chalkboard, and dry erase section. While she already has a big, standing chalkboard/ dry erase board that we keep in the playroom, she is loving this new board on her wall. If you are interested in seeing what I did, keep reading! What You Will Need A Frame, the larger the better Cork board (Dollar Tree) Scrapbook Paper  Chalkboard Paint Painters Tape Acrylic Paint (Your Choice Of Color) Elmer's Glue or Mod Podge Hot Glue/ Glue Gun $3.00 at Goodwill From Dollar Tree- crafting section Directions 1. Remove the back of the frame, On the side that will be your background, glue down the scrapbook paper to one side. This will be the background to your dry erase board so make sure that you choose a light background. On this frame, the picture ...